For some reason, Windows 10 struggles to let you use your webcam across multiple apps. In most cases, when webcams think they are being used by an app, they will light up and won’t be usable in other apps. So let’s take a look at how we can identify which app is using our webcam so that we can stop it.
How to Find Your Webcam Process in an App to Stop it
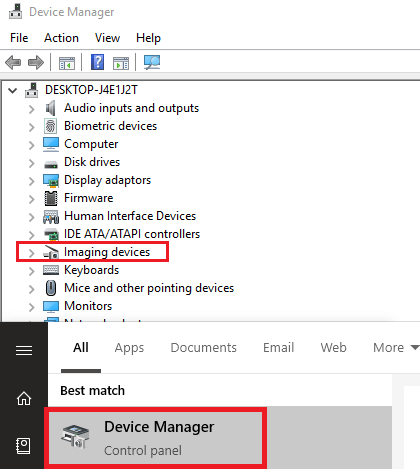
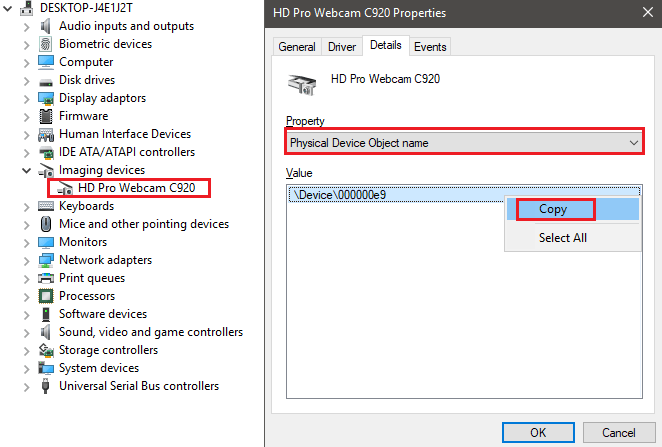
To find our webcam, we’ll need to understand what the name is in the device manager. From there, we can search our running processes to find matches to our webcam. To begin with, open your Start Menu and search for Device Manager. Click to open device manager when it appears. Search for the Imaging devices section and click to open the dropdown arrow. Next, right click your webcam and click Properties. On the new window that appears, click Details. Next, click the Property drop-down box and search for Physical Device Object Name. Right click the listing that appears and click Copy. You can now close that window down. You now have your device name and you will be able to search your running processes to find out what application is using your webcam.
How to Use Process Manager to Find Which App is Using Your Webcam
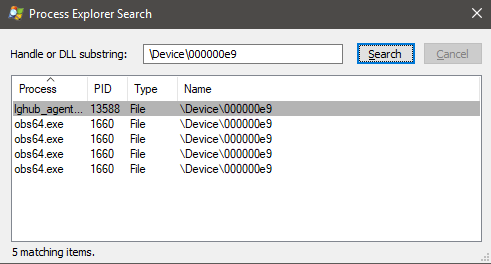
For this step, you must download Process Explorer. It’s a program available here from Microsoft Sysinternals. Once you have downloaded the file, extract the Processexplorer.zip archive file. Once extracted, navigate to the extracted folder and click to open procexp.exe. Click Agree when prompted. You should now see a complex process manager, similar to what you see on Task Manager. Click Find and then Find Handle or DLL. Copy your device name into the Handle or DLL substring box and then click Search. It may take some time for the results to populate. You will now see the list of applications currently using your webcam. If you cannot understand what each of the apps are, click on them in the search results page and you will notice that they will be highlighted in gray on the main window for Process Explorer. If it’s an app you recognize, you can close it down and webcam access from that app will stop. At that point, you should now be free to use your webcam in another app without hitting any problems. If you are still having issues, it may be another unrelated problem. For example, an issue with the software itself. Or perhaps there is an option in the settings menu for that software to change your default webcam. If you do not recognize the program in the search results, a quick search on Google should return some accurate results. In some cases, it may just be some kind of software necessary for your webcam. It’s unlikely, but it could be malware that is using your webcam. In this case, you can click on it to highlight it in Process Explorer. Then, right click it in the main window and click Kill Process. After that, you should follow our guide to check and completely remove malware from your Windows PC.
Summary
I hope that this guide has helped to teach you how to find out what app is using your webcam in Windows 10. By following this guide, you can ensure you don’t run into clashes with your software and you can double check your camera isn’t being used by malicious software.


